Marvel’s Captain America Inspired Applique Quilt – Part I

DISCLAIMER: I am not a professional quilter, any and all advice given is from me, a novice/self-taught quilter that’s still figuring things out. So if you know a better way, do it!! And, to all the accomplished quilters out there, I’m sorry if I’m doing everything wrong.

So novice or not, I do love quilts and blankets. There is something so comforting and so full of love about them. I slept with the quilt my grandmother made me until I was…well…I don’t think we are close enough for me to admit that yet. 🙂

Anyway I just finished a quilt for my newest nephew. Of course, it needed a theme and my nephew’s dad (my brother-in-law), LOVES comic books and such. They go to ComiCon, dress up, the whole thing, they are R-E-A-L-L-Y into it. Because of my brother-in-law, I’ve even enjoyed all the Marvel movies, and Superman and Batman…and I have to admit I’m a fan too.

So, I was at Joann’s looking for inspiration and I found this great Marvel print. Now, it is way TOO much for the entire quilt, but perfect for the backing. With some thought, I decided to make a Captain America inspired applique quilt for my nephew’s first birthday present. And, SPOILER ALERT: It. Is. Awesome.

Materials: (all purchased at Joann’s)
Flannel Marvel Print Fabric
Flannel Red, Gray, and Navy Blue Fabric
Interfacing
Coordinating Thread
Quilt Batting
Coordinating Embroidery Floss

Marvel Fabric

The Plan:
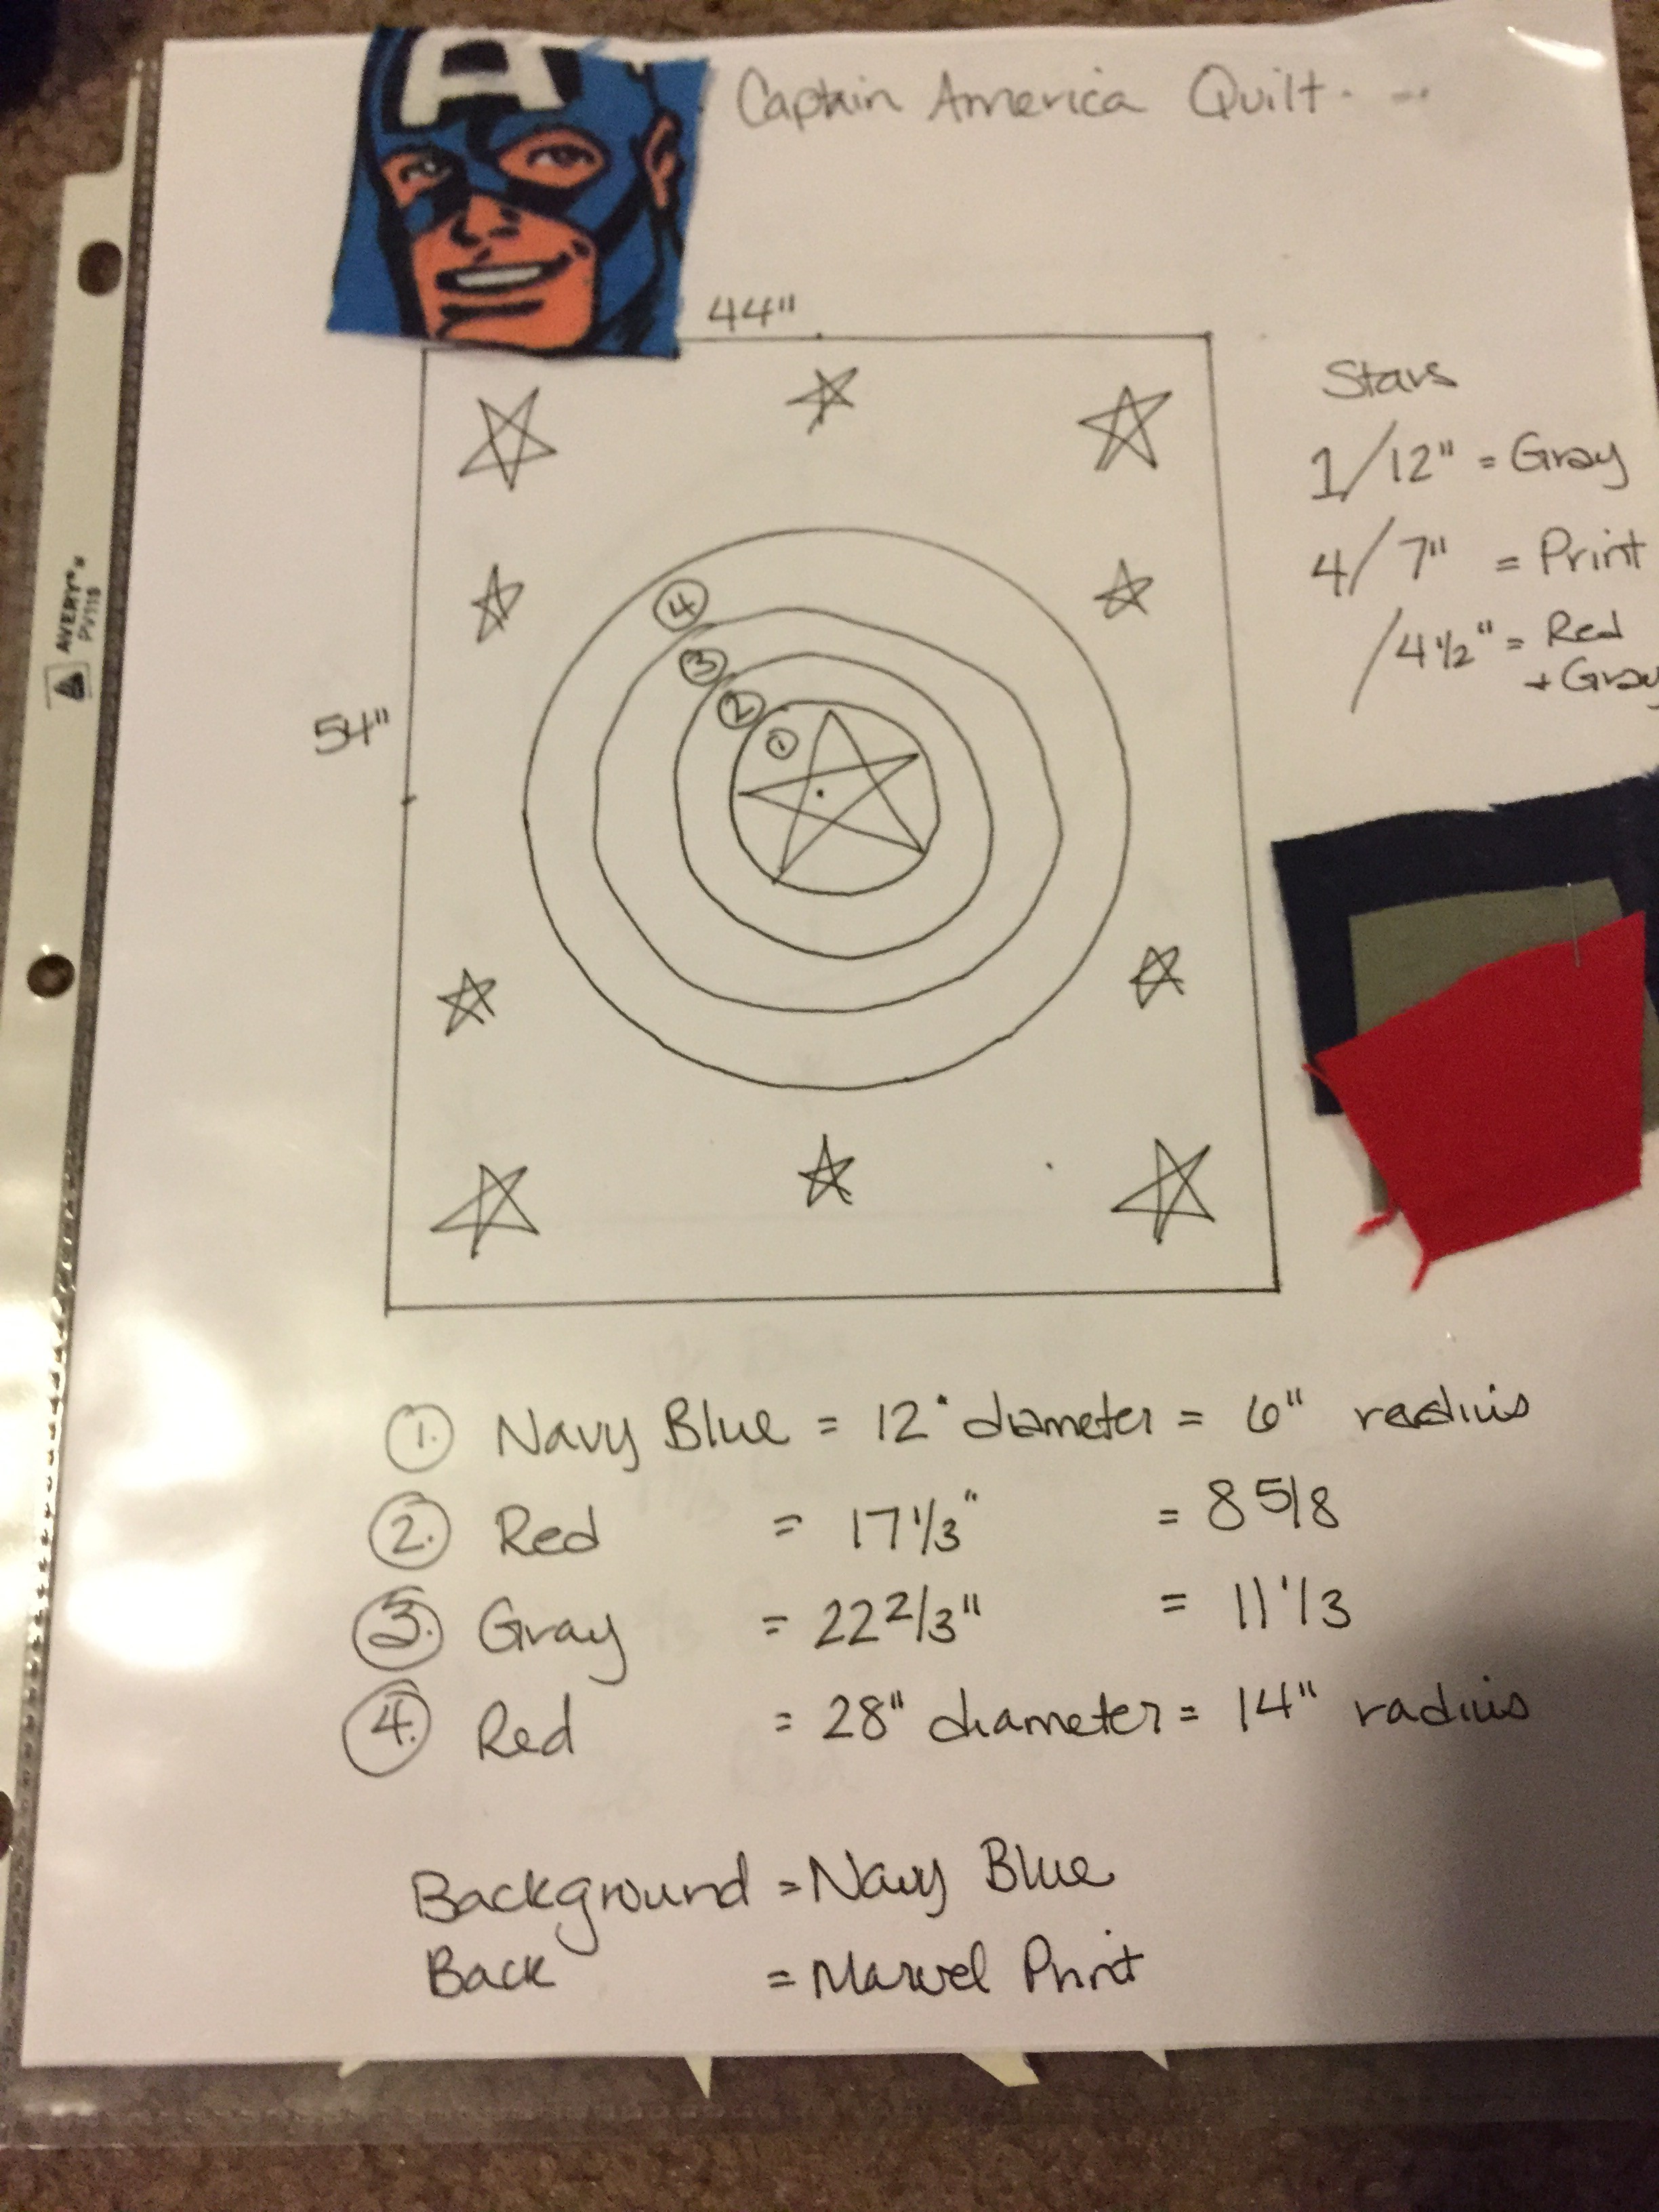
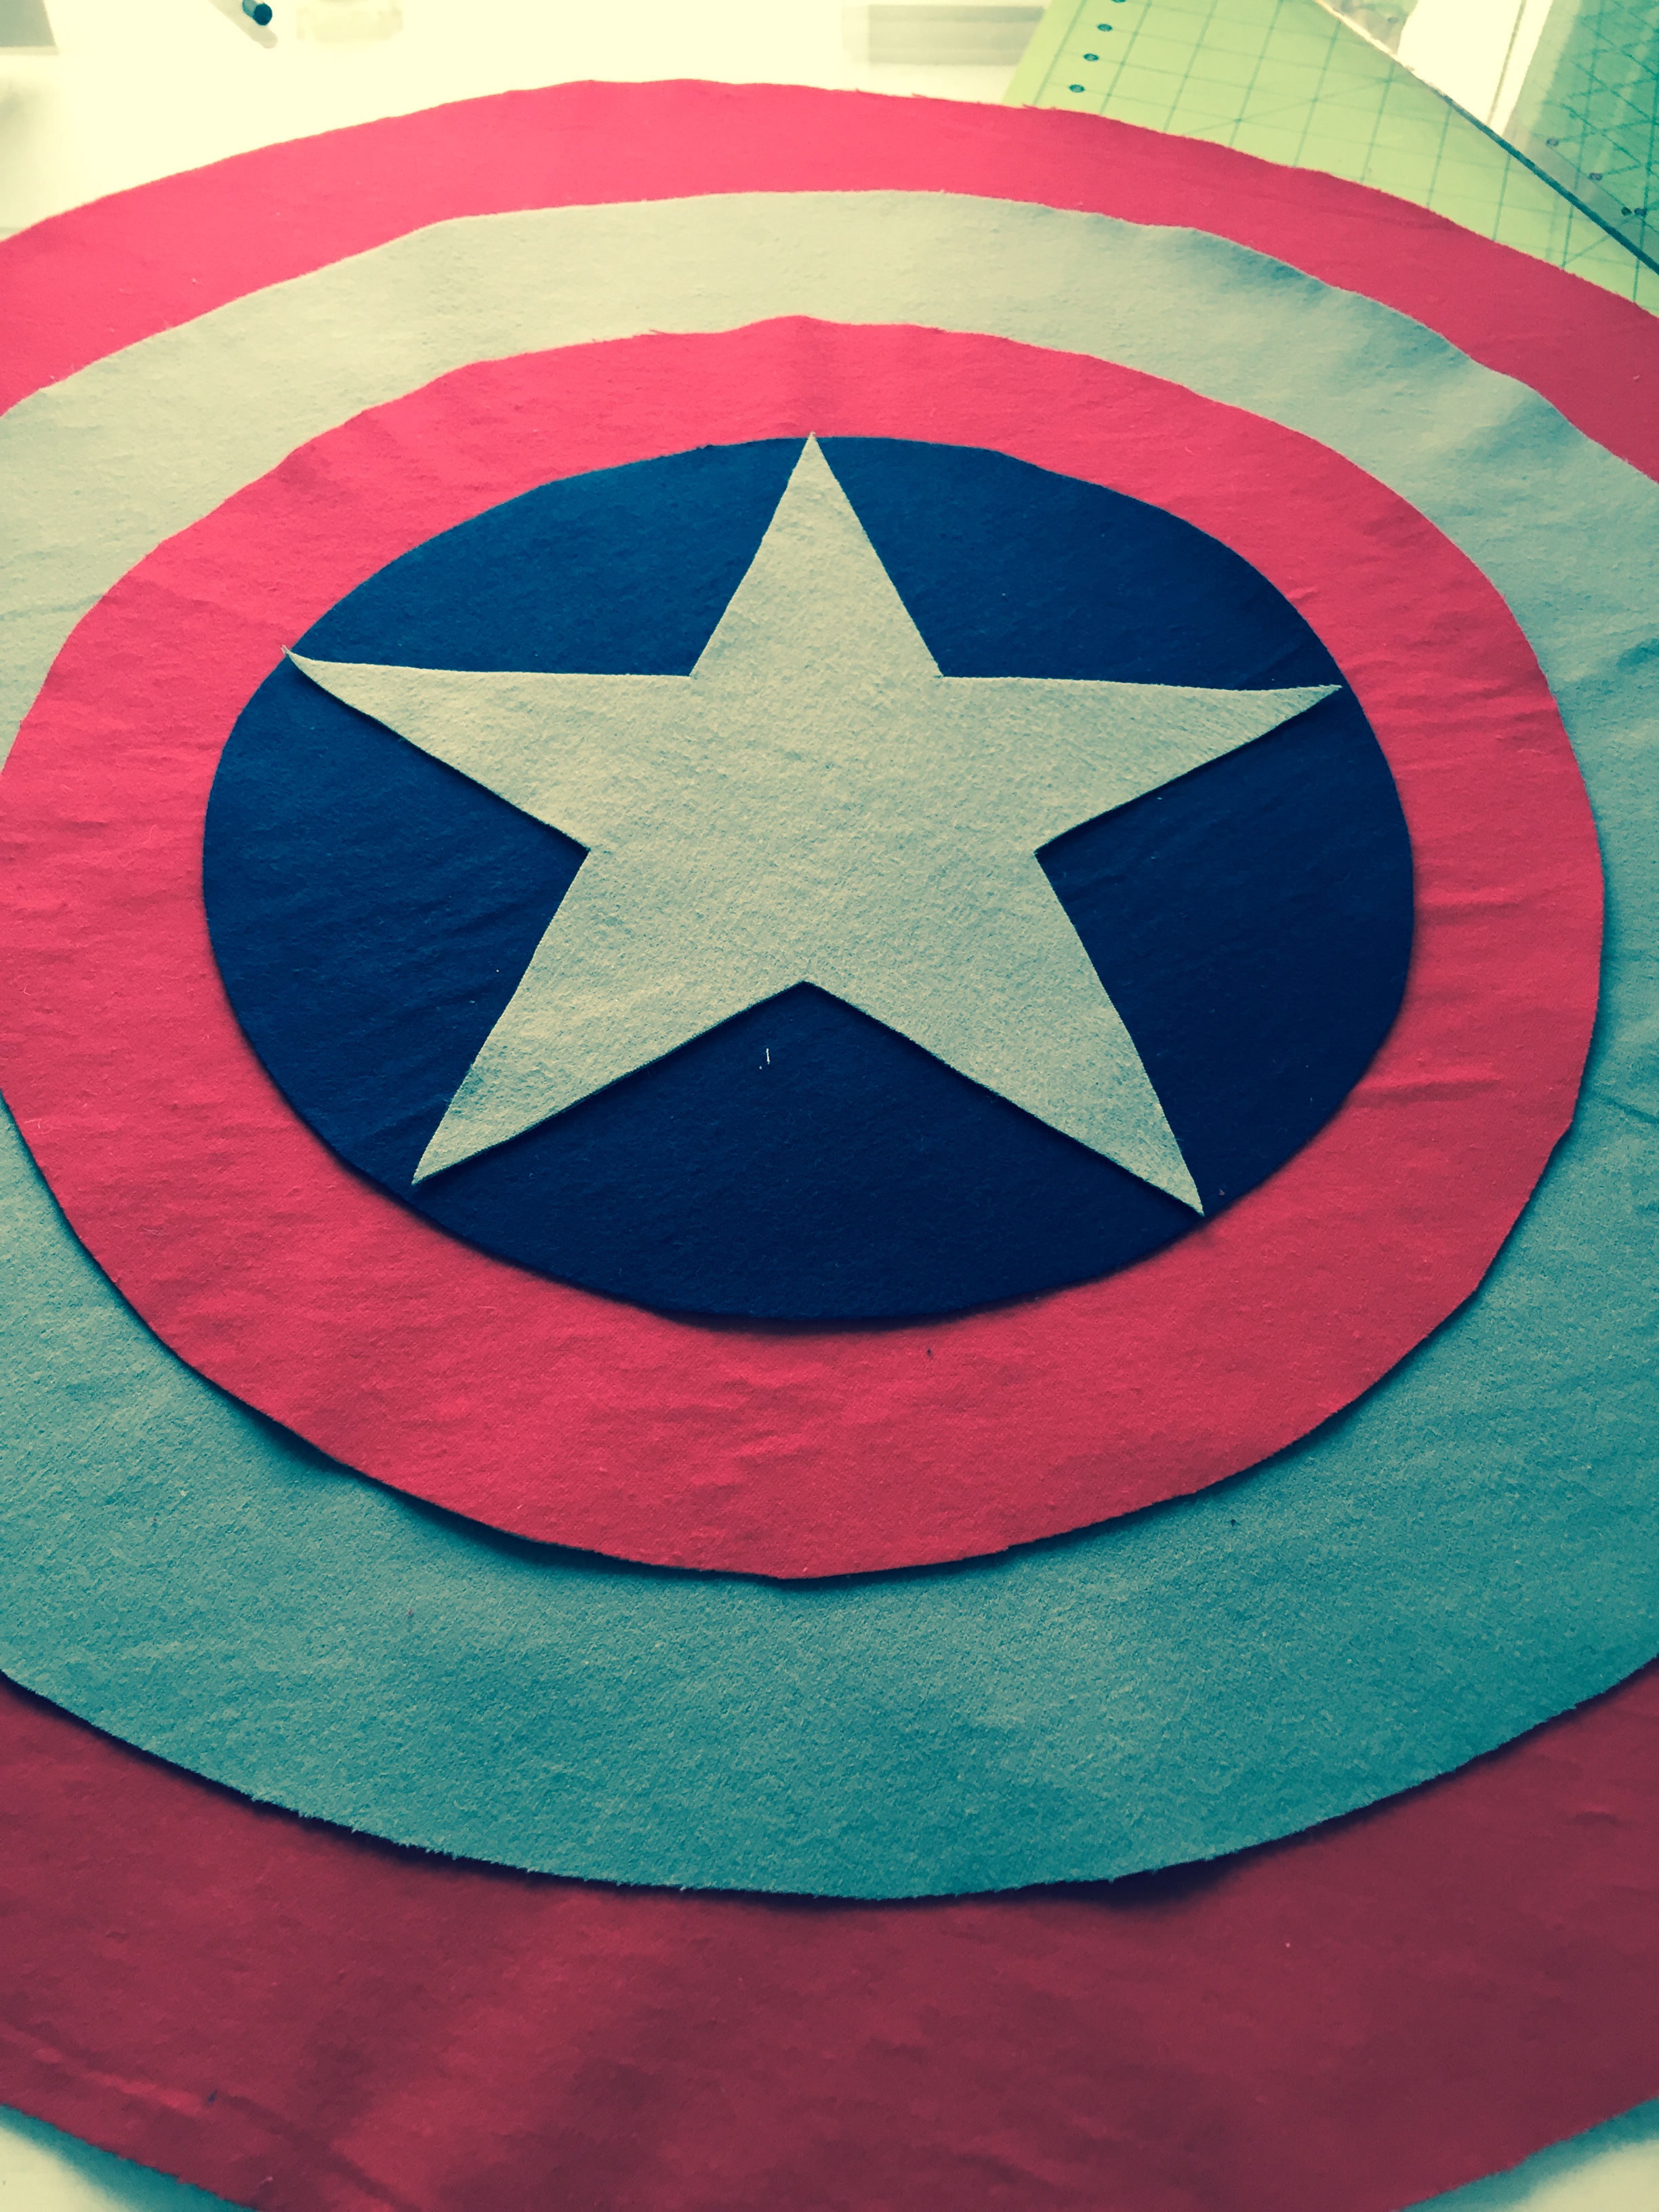
For big projects like this, I like to map out what I’m trying to do. It really helps me think through how much fabric I’m going to need and what dimensions are going to work best. I wanted my finished quilt to measure 54″x 44″ so every subsequent measurement was based on that. I know the circle measurements seem a little odd, but I wanted to make the largest circle in the shield as big as possible given the fabric width, so I started there. Then I decided how big the smallest circle should be and the other two ended up splitting the difference. Anyway here is my plan…

Captain America Quilt Plan

Cutting Out:

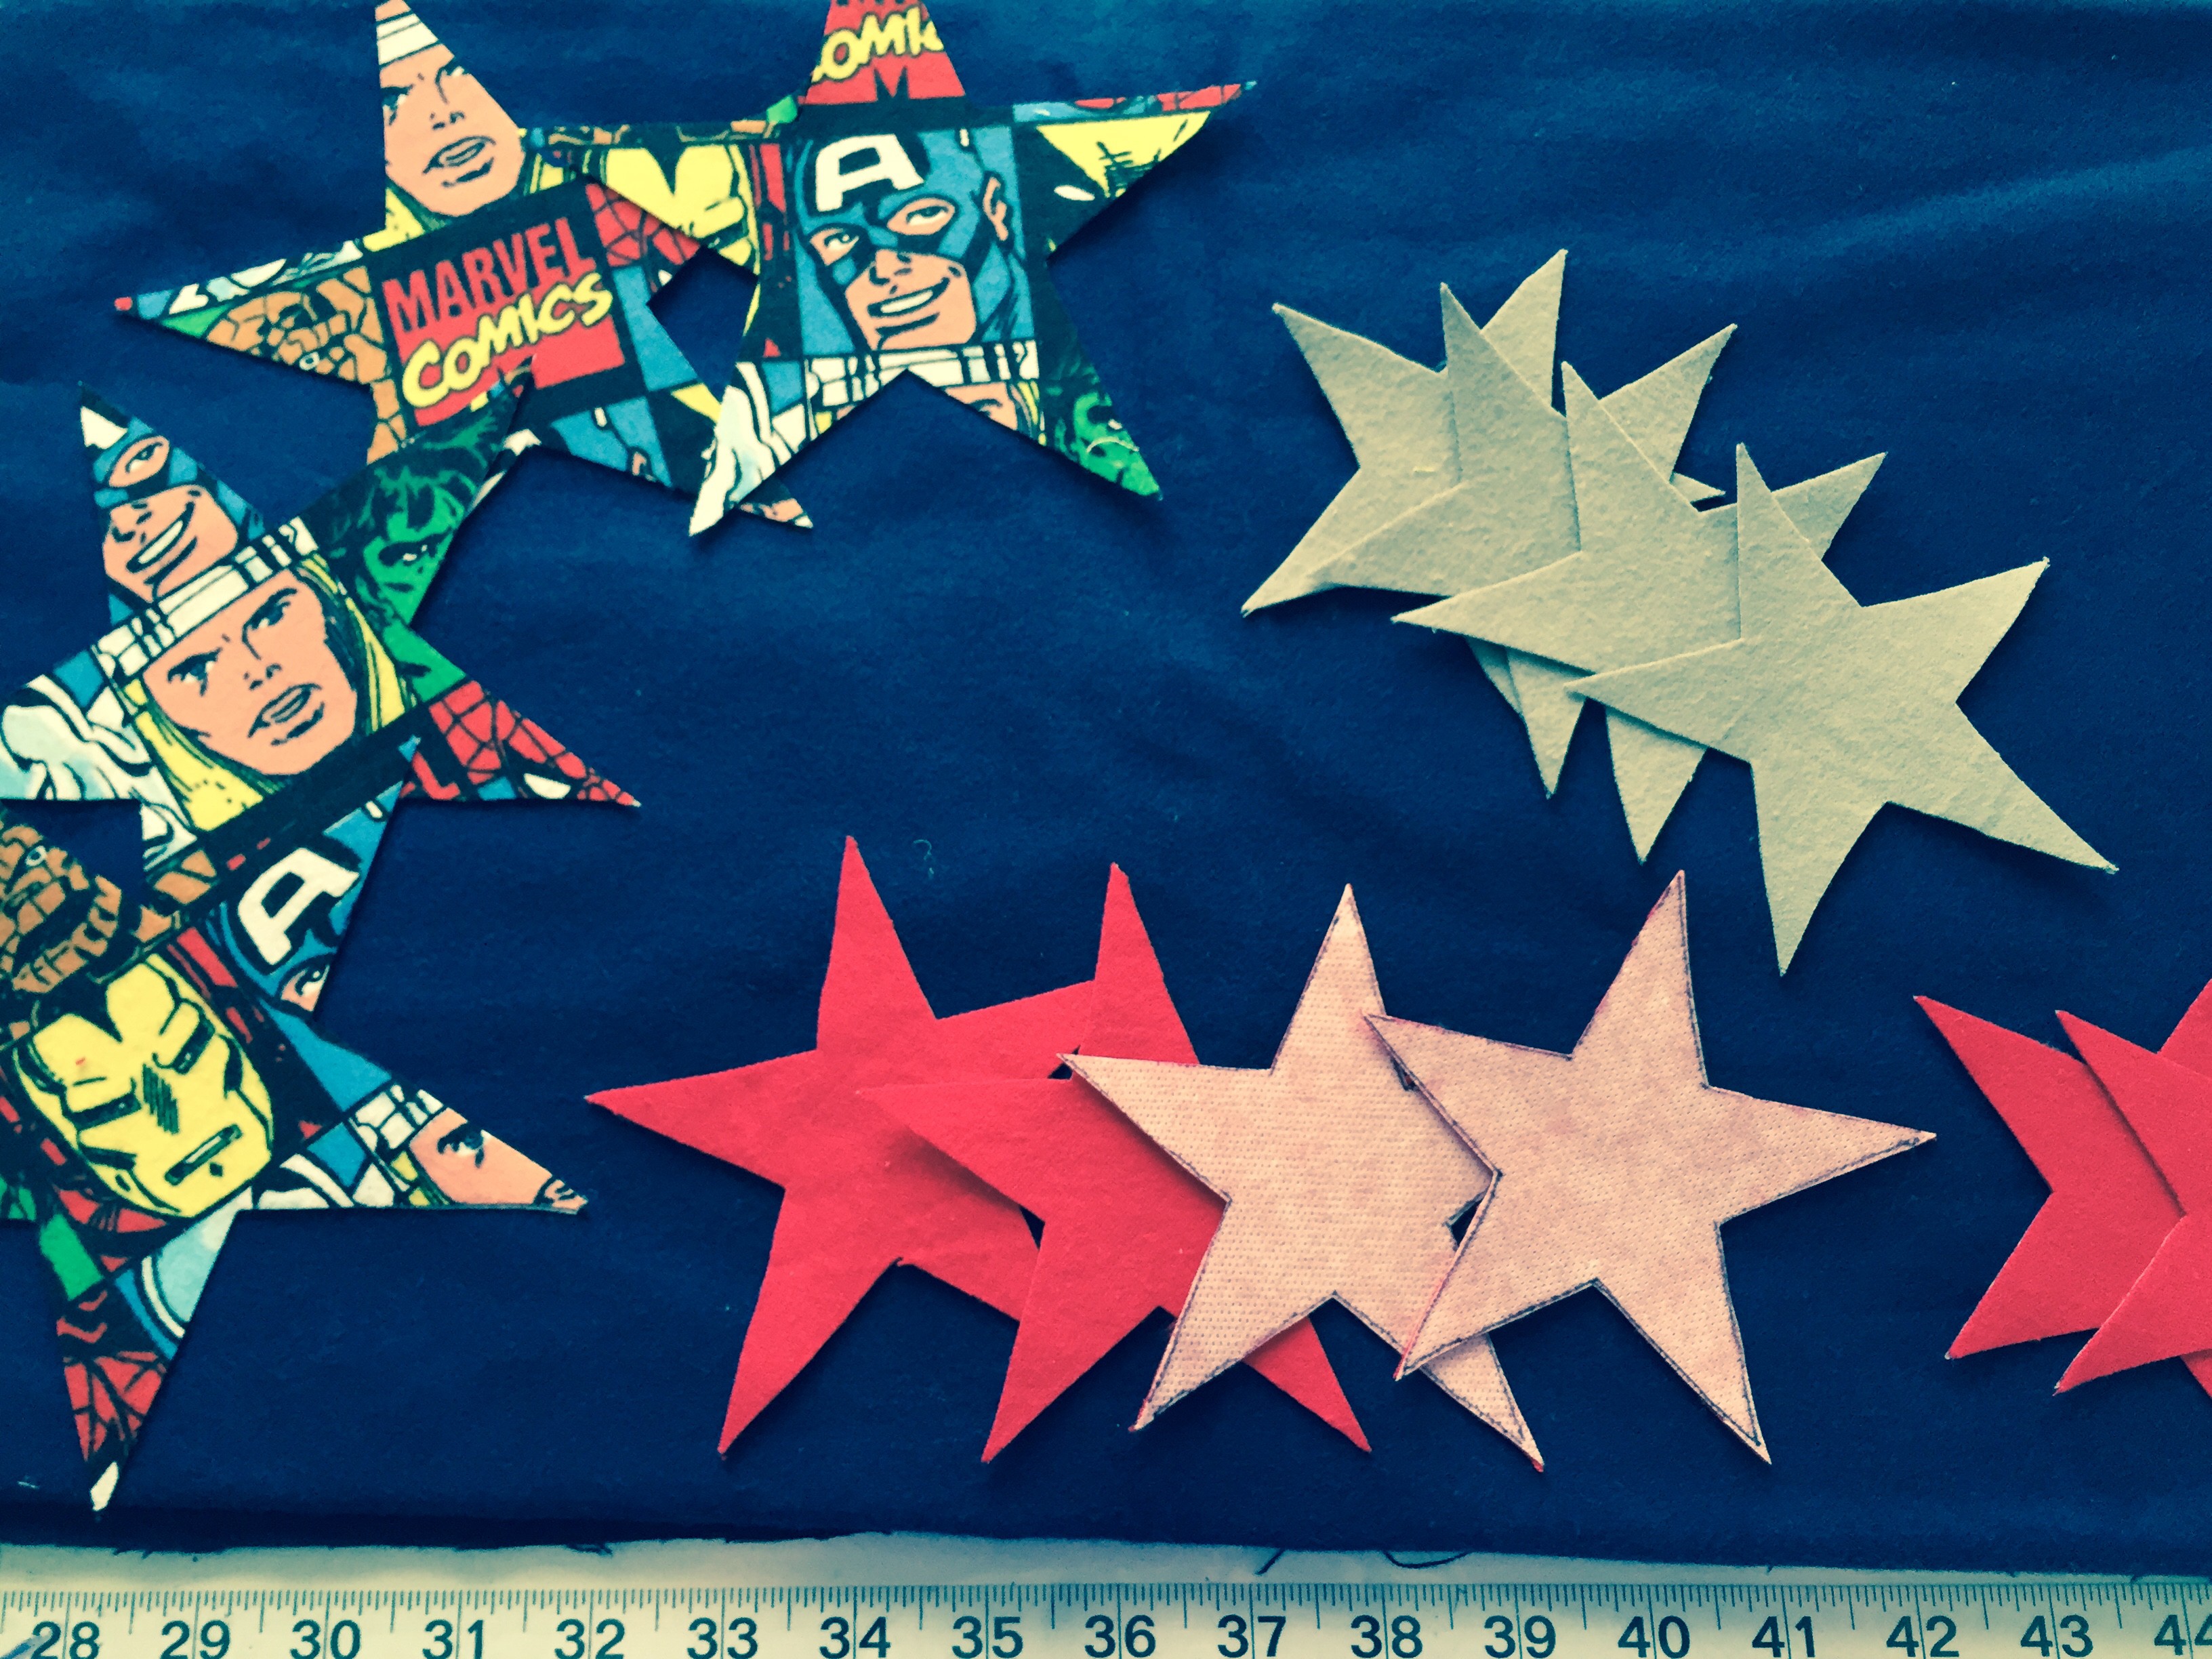
  1. I started by creating patterns for my stars. I decided I needed three sizes of stars. The big star for the center of Captain America’s shield (12″), and then two sizes of stars to applique on the rest of the quilt (7″ and 4.5″). Here’s my pattern if you want to use it, Star Template.
  2. To applique the stars, it is important to use interfacing to strengthen the fabric, it also helps give a really clean edge. So trace out your stars on interfacing – one 12″ star, four 7″ stars, and eight 4.5″ stars. I’ve done another applique quilt where I skipped this step, and it’s still on my to-do fix it.
  3. Once you trace out your stars on the interfacing, cut them out leaving at least a quarter-inch around them.
  4. Arrange the stars on your fabric and iron on. I did the 12″ star  on the gray fabric, the 7″ stars on the Marvel fabric (I lined these up carefully), and four each of the 4.5″ stars on the red and gray fabric.
    Marvel Stars
  5. Now you cut out your stars.
  6. Next I cut out the circles for the shield, following the sizing on my plan above. I also used interfacing on each of these pieces, following the same system as the stars. Trace pattern, iron onto fabric, cut out.
    Captain American Sheild
  7. Cut out the front and back pieces. Leave an extra inch or two on the front piece, and a couple extra inches for the backing.

Phew, all the pieces are cut out…we are ready to start sewing next time. You can now read Part II here!

–h

DIY Christmas Tree Skirt

I thought it would be a good idea to wash our tree skirt in preparation for Christmas.

It. Was. Not.

Instead of a clean red and white tree skirt, I ended up with a clean red and pink tree skirt. Now, anyone knows me knows I am a big fan of pink. But I was not happy.

Instead of going out and buying a new one, I thought I could make a customized tree skirt. I know you might be shocked to learn, but I have a black, white, and red themed tree complete with polka dot ornaments. Shocked, right?

Materials:
Coordinating fabric – So I used some fake black velvet fabric and a Christmas print I found at Joann’s.
Matching Piping and Bias Tape or Ribbon
Ribbon to make ties

How-to:

  1. Start by cutting a circle out of your main fabric. Determine the desired radius of your tree skirt (mine was 18”) plus the radius you want to allow for the tree itself (a few inches). Draw out ¼ of a circle on tissue paper or wrapping paper to create your pattern. Lay out your fabric so you have four layers of fabric (fold in half lengthwise, then in half the other way). Pin your pattern and cut out.
    Tree Skirt Pattern
    The fake velvet I used had some stiffness to it, so I didn’t need to do anything to it, but depending on your fabric you might want to stiffen it with some interfacing or a second layer of fabric.
  2. You will need a second pattern for the accent fabric. The easiest way to do this is to use the first pattern to draw a second pattern using by adding 6.5” to the radius measurement from step one. This illustration should help explain.
    Tree3
  3. Cut an opening in both pieces. Again, this illustration is what you are looking for.
    Tree2
  4. Sew the accent fabric onto the main fabric, right sides together.
  5. Next I attached the bias tape between the two fabrics. You could top stitch this in place, but I cheated and used some stitch-witchery to make it easier.
    Tree skirt
  6. Next, I sewed the piping along the bottom of the accent fabric. I love finishing things with piping, it just looks awesome and I like the way it looks better than just a hem.
  7. Then, I hemmed the opening edges.
  8. Finally, I added ribbon ties every 5 or so inches in the opening. You could do buttons too, that would be really cool!
    Tree skirt

And a complete disaster (no, I’m not being overly dramatic) turns into an opportunity for creativity!

Tree skirt

–h

DIY Jane Austen Quote Shadow Box

Me again, with another Christmas gift idea!! I have a dear friend that loves all things Jane Austen and Regency — the books, the movies, the clothing, the dancing…and I’m right there with her. We joke that we were born in the wrong era. We would have been so good at wearing the beautiful gowns, dancing the night away at balls, dodging unwanted marriage proposals…

In fact, here’s a picture of me and Ryan all dressed up in our costumes for a Regency Ball.

Regency Pic

Ok, sorry, back on topic. So here’s a fun gift idea for the Jane Austen/Regency fan in your life. I made my friend a Jane Austen quote shadow box, it was very simple and she LOVED it!!

Materials:
Shadow box – I found mine at Michael’s
Scrapbook paper – I used parchment paper and a handwriting print
Photo corners – Again from Michael’s
Embellishments – I used an antique key, ribbon, a brooch (from Michael’s not a true antique), and antique button

How-to:
1. Choose a favorite Jane Austen quote, here are some good ones:

There is no charm equal to tenderness of heart.
–Emma

To be fond of dancing was a certain step towards falling in love.
Pride and Prejudice

Friendship is certainly the finest balm for the pangs of disappointed love.
–Northanger Abbey

It isn’t what we say or think that defines us, but what we do.
-Sense & Sensibility

I must learn to be content with being happier than I deserve.
–Pride & Prejudice

I may have lost my heart, but not my self-control.
–Emma
(I can totally hear Gwenyth Paltrow saying this in Emma)

A girl likes to be crossed a little in love now and then. It is something to think of.
-Pride & Prejudice

Every moment has its pleasures and its hope.
–Mansfield Park

There could have been no two hearts so open, no tastes so similar, no feelings so in unison.
–Persuasion

Ok, there are a TON of great quotes you could use depending on the person you are giving the gift to. Just google it! 😉

2. Type up your quote using a cool script font. I actually found a font called Jane Austen, can you believe it? You can download it for free here: http://www.dafont.com/search.php?q=jane+austen

3. Depending on the size of your shadow box, cut out the scrapbook paper you used for your background, then cut out the quote to layer on top of it. You want to be able to see a good amount of the background paper, so size your quote accordingly. I used double sided tape to put the two pieces of paper together.

4. Now is the fun part, embellishments! This is where your creativity can really soar. I just put together vintage or antique looking knick-knacks that I thought would look good together. I used a brooch (not actually an antique) from Michael’s, tied some ribbon to an antique key, and found a cool old button I thought would look good too. I played around with the arrangement until I found one I liked, then I carefully hot glued everything together and added the cool photo corners.

WARNING: Be careful wielding that hot glue gun, those things are brutal. We are talking permanent scars, physical and emotional.

5. Stand back and admire your creativity!

And just like that, you checked someone off your Christmas list with something unique and special.

Jane Austen

–h

DIY Elsa Inspired Cape

Ok, so I promise that not all of my posts are going to involve Elsa and Disney’s Frozen. Seriously, I promise. But right now, it seems like it is unavoidable. Like I mentioned in a previous post, my niece loves to sing, dance to, and act out the entire scene that corresponds to Let it Go. It’s really quite cute and pretty darn impressive. When I was watching her go through the motions, it became clear, she absolutely NEEDS an Elsa cape.

DIY Elsa Inspired Cape

Materials:

Blue snowflake material (I used some from Joann’s)
Matching Thread
Assorted trims

How to:

  1. Create your pattern. I decided to do a “half-circle” shaped cape to give the cape some good swirl and swish. Perfect for dancing in! Create a pattern for yourself out of wrapping paper or tissue paper. Appropriately for this time of year, I used Christmas paper.
    You are aiming for ¼ of a circle for your pattern (that will fold out to half of a circle). The radius of that circle should be the length of cape you wanted. For my 4 ½ year old niece, that length was 38″. You will do a much smaller 1/4 circle at the top for the head and shoulders. The following graphic should help illustrate what you are going for…
    Cape1
  2. Lay out your pattern on your fabric on the fold. Pin and cut out.
    IMG_4342
    Here is the shape you are going for.
    Cape2
  3. Next, I decided she needed a stand collar. I measured the opening of the cape and drafted a simple pattern (see below). I’m sure there is a right way to do this, but I just measured the opening at the top of the cape and decided about how tall I wanted the collar, and I drew a slightly curved shape within those dimensions. My dimensions were 13″ x 4″.
    Collar pattern
  4. Right sides of collar together, sew the top and two sides. Trim seams, clip corners, turn out, and press. Pin the collar to the cape, right sides together. Sew the seam. Trim seams, press and then top stitch. This helps the collar stand up.
    Stand Collar
  5. Next I hemmed the front edges of the cape.
  6. Now is the fun part, trim!!I promised my niece that we would work on her cape together so I pulled out all the lace, ribbon, trims, buttons, etc. that I could find and I let her pick out how she wanted to embellish her cape. Uh, a bit of a mistake. She ended up choosing red rickrack and black sequins… With some coaxing I talked her into some silver ribbon and white lace, but she insisted on the pink ribbon for the tie. Not exactly Elsa, but you can’t blame a girl for loving pink. You can, of course, use your own judgment on how to embellish.I started with lace along the bottom of the cape and added some silver ribbon about 1/2″ above the lace.
  7. I then attached the pink ribbon around the neck. Along with some sparkly buttons just for fun.
    Elsa Cape

And there you have it, an Elsa inspired cape!

–h

P.S. Can’t get enough of Elsa? Check out this simple Frozen inspired t-shirt!

Tutu Tuesday: Part II No-Sew Tutu

Tutu Tuesday part two, now that’s fun to say!! Tutu Tuesday continues this week with an even easier project!! Be brave, give it a try!

No-Sew Tutu

This tutu is quick, easy, super cute!! I made one for my niece for Christmas a few years ago and my sister also made her one to go with the Elsa Snowflake t-shirt. Now I think Kyrie needs her first tutu!

Materials:
Tulle – yardage depends on if this is for a little girl or a big girl… Start with at least 4 yards
1” Elastic long enough to fit around the waist plus 1 inch.

How to:

  1. Use a rotary tool and rotary mat and cut your tulle into 4” wide strips. You want them to be twice as long as you want the skirt. For example, for a 12” skirt (for a toddler) you will want 24” strips. I cut 12″ strips for Kyrie (she’s in 3 month clothes right now).
    Tutu5
  2. Sew the ends of your elastic together (I promise this is the only sewing). Overlap ½” and sew it together securely. Remember there will be tension on this stitch.
    Tutu7
  3. Use a dress form, stuffed animal, pillow, or something to put your elastic around. Start attaching the strips to the elastic, like so..
    Tutu8
    Tutu2
    Tutu3
  4. Continue until the tutu is as full as you desire. You can fit a bunch of those little strips on the elastic so just keep going. The poofier the better if you ask me!!
    Tutu4

Make it even more fun and mix two or three colors of tulle. Green and red for Christmas, different shades of blue for Elsa, etc.

Perfect Christmas gift for a little girl in your life. Also, a great project you could do work on with a cute kiddo.No-Sew Tutu
(my sweet niece playing in her tutu with her friend, Jessie)

–h

P.S. Did you miss Part I? Or you can read the conclusion of Tutu Tuesdays here.

Tutu Tuesday: Part I Tulle Circle Skirt

Confession: With the new baby at home, I’ve become a Dutch Bros junkie. Seriously, it’s getting bad. Last Tuesday, I drove up and everyone was wearing a tutu and a tiara. I’ll admit I was just a little jealous!! So I told the girl getting my coffee that I loved her look, and she replied…We’ve established it as Tutu Tuesday.

Um, every girl needs a Tutu Tuesday, don’t you think? So here’s a DIY Tulle Skirt for you…

Tulle Circle Skirt

I found a ton of great tutorials on Pinterest, check-out my Crafty Ideas board for several good ones. If you run into questions during my tutorial, those might fill in any gaps. 🙂

Materials:

  • 6 yards (at least) of Tulle – I used green because I was Disneybounding Mike Wazowski for Halloween.
  • Appx 1 yard of matching Lining Fabric
  • Elastic the size of your waist plus 1 inch – You want this to fit snugly, but not too tight (we don’t want a tulle skirt muffin top, yikes!)

IMG_4075

How-to:
1. Determine the length of your skirt. Measure from your waist down to where you want the skirt to end. I went down to my knee.

2. Determine your waist radius. Measure around your waist, divide that by 3.14, then divide that by 2. That gives you your waist radius.

3. You are basically going to cut out a number of tulle “doughnuts” out of squares of tulle. So add the waist radius to the skirt length and multiply by 2. That will be the length you cut your fabric. You also want the width of the tulle to be at least equal to that same measurement. So cut several of these pieces. I would do at least 4. Do the same for your lining fabric (just 1).

Here’s what we are going for:

FAbric

4. Now fold each piece in half lengthwise. You should have a square piece of fabric with 2 folded sides.

Fabric2

5. Now take your waist measurement and skirt length to create your pattern.

Skirt pattern

Tip: Create a pattern out of tissue paper or wrapping paper. You’ll thank me for this step because tulle can be challenging to work with.

If you think about it, here are the tulle doughnuts you are cutting out so make sure your folds are the right places…

Skirt graphic

6. Pin your pattern to your first piece of tulle, and cut out. Repeat 4+ times and 1 time for your lining fabric.

7. Hem your lining fabric.

8. Take your tulle and lining circles and layer them on top of each other. Pin and baste around the waist line.

9. Take the ends of your elastic and overlap ½” and sew together (remember this is an important stitch that will have pressure one it).

10. Pin your skirt to the elastic. Zig-zag stitch around. Done!

Tulle Circle Skirt

Again, this was for a Halloween costume, I’m excited to make one in black or red for the holidays.

Happy Tutu Tuesday!! Also, anyone also in the mood for a doughnut or some coffee now?

–h

P.S. Part II continues here

Disney’s Elsa Snowflake T-Shirt

What little girl right now doesn’t LOVE Elsa from Disney’s Frozen? I think we met at least 100 Elsa Princesses this Halloween. But seriously, what’s not to love… she’s a princess, she can sing, and she has frozen powers. Well, my niece is no exception, she is a huge Elsa fan. She loves to perform “Let it Go” complete with every hair toss, cape swirl, and dance move. It’s incredible how this movie has little girls (and boys I hear) completely smitten.

That said, of course we had to do an Elsa project. My sister and her family went to Disneyland this summer and my niece really wanted an Elsa outfit. My sister decided to make a no-sew blue tutu and I had an idea.

For those of you who don’t know, Ryan loves to make paper snowflakes. For the last three winters, he has spent hours drawing out increasingly complex and beautiful snowflakes. You would not believe some of the incredible designs he comes up with, it is really fun to see his creativity. I have snowflakes for my office, for my dining room, and they keep coming! Anyway, I thought this would be the perfect opportunity to put his talent to good use. 😉

My sister bought a t-shirt to match the tutu, and I put Ryan to the task of designing a snowflake inspired by one of the snowflakes from the movie (don’t worry, Ryan will share his snowflake making secrets in a future post coming soon).

The inspiration…

Elsa snowflake

The pattern…

Elsa snowflake template

We then bought a silver sparkly glitter iron-on transfer. Ryan then traced his design onto some card stock and then cut it out of the transfer with an Exacto knife on a self-healing rotary mat.

Snowflake iron on

Then, following the iron-on transfer instructions, I ironed on the snowflake. The result, a special Elsa shirt for my sweet niece!

Elsa Shirt Best

A super quick and easy DIY anyone can do! Need a gift idea for, well, any little girl? This is it!!

–h

P.S. Ready to kick it up a notch? Try this Elsa Inspired Cape next!

Reupholstery Part II: Deconstruction

So, I know this seems like a big daunting project. You might have a piece (or pieces) of furniture you have been wanting to reupholster for years. You can do this. Seriously, you can. There is actually very little sewing involved and you get to use a Staple Gun, so that’s something. Don’t worry about all the steps, just methodically go through one step at a time and you can do it!

IMG_2120

Once again, I’m no expert, and truly there are TONS of great tutorials out there on the right way to upholster/reupholster furniture. I would recommend reading a few of them and even watching some YouTube videos before you start. My purpose, and what I want to leave you with, is  to show you that if I can do this project, so can you!

So, we’ve gathered out tools and materials, given ourselves a little pep talk, and it’s time to get underway. Yay!

1.  Take pictures of your chair. Every angle you can think of. Pay special attention to different seams, and connection points. When you go to reassemble your chair, you will find yourself asking, now how did “they” do that again? If you document it well, this current piece of furniture is the best tutorial you could ask for.

IMG_2129  IMG_2123   IMG_2134

2. As you take pictures of your chair, conduct a careful inspection and figure out what the last piece on was. Depending on your chair, it could be mesh on the underside, it could be the skirt (which was how mine was), or it could be the back panel. Whatever the last piece on was, will be the first piece off.

IMG_2118   IMG_2125

3. Deep breath, it’s go time! Figure out how to remove that piece that you determined was the last one on. It might be stapled or “they” might have used a metal piece called Pli-Grip (see pic below). For staples, I mostly used the flathead screwdriver and sometimes the mallet and/or pliers to get these out. I kept a small Tupperware container next to me to put all the removed staples in. If they used Pli-Grip, use your screwdriver to pry it away from the chair and then screwdriver/pliers to remove the tacks or staples used to keep the Pli-Grip in place.

IMG_2126   IMG_2128

4. As you remove each piece, take a Sharpie and label the crap out of it. I wrote what the piece was, right, left, top, bottom, etc. Again, the better you document now the easier it is going to be to reassemble it correctly later. IMG_2176   IMG_2171

5. Continue taking pieces off and labeling and taking pics. I also kept a list of the order I removed things, because again, the order you remove things, informs how you put it back together just in reverse. Keep everything, any little cardboard strips, piping, etc. Again, all important. Have I said that too many times?? 🙂

You will literally remove a kajillion staples. Yes, a kajillion. It may seem like the process will never end. But don’t worry, when you feel like you could build your house with number of staples you have removed, you are almost there. 🙂

–h

Monster’s Inc. Boo Halloween Costume – Part III

The long-awaited and much-anticipated final post on Kyrie’s Halloween costume is in!! I know, pins and needles, right?

Teeth, check.
Hood, check.
Now onto the body!

Ok, so I really had to think through the design and construction of this costume. One sleepless night, and I had a plan! It would have been easier if I didn’t want to finish the inside, but I want Kyrie to be comfortable so it just took a little extra brain power to get it right. One thing to note, you don’t actually need three pieces for the body, I was going to put a zipper in the back and after I cut out my pieces I remembered that the hood is attached to the back, so the closure will need to be at the side-seams. Typical me. Oh-well, live and learn. 🙂

Back:
So, I started by just closing that center back seam. You can baste the batting and exterior (purple) fabric together. Then, right purple sides together, sew, trim, press. Then separately (because I want a finished interior) sew the right sides of the exterior (gray) fabric together.

Then right side purple to right side gray, sew one side seam starting 1/2″ from the top (don’t forget the arm hole). This seam will be a finished edge with Velcro to attached the front to the back. Trim, clip curves, turn out and top stitch. Leave the other side unfinished at this point.

IMG_3899     IMG_3901    IMG_3902

Front:
Next, I did the Velcro edge of the front of the costume. Same process. Baste batting to purple fabric. Right sides of purple to right side of gray sew one side seam (the one that meets up with the back of the costume). Again, make sure to do the arm hole. I added an extra half-inch to the “depth” location of the arm hole to allow for the overlap of the Velcro. It’s kinda hard to explain, hopefully this picture helps. Trim, clip curves.

IMG_3906

Now for the top edge of the front of the costume. Don’t forget to insert the teeth between the gray and purple fabric. Then then sew along the top edge of the costume, ending about ¾ of an inch from the unfinished side. Trim, Press. Turn out and top stitch both side and top seams. Next top stitch a channel (3/4”)  into the top front of the costume for another piece of boning. Slip the boning in.

IMG_3909

Next, I connected the front of the costume to the back. This is just a little tricky with finishing and the arm holes. Baste purple fabric to the batting. Purple side to purple side, stitch the side seam before and after the arm holes. Do the same with just the gray fabric. You will now have finished edges other than the arm holes. You can press the seam allowance on the arm holes, clipping curves, and then top stitch the purple to the gray giving you a finished arm hole.

IMG_3933

Next, I top stitched four rows into the body of the costume. I just took the length and divided out four equal sections (taking into account the seam allowance for the bottom). I measured carefully and marked my lines with pins and stitched.

IMG_3935

At this point I sewed on the Velcro to the front and back Velcro edges. Be sure to do the back side of one and front side of the other. I did the back-side of the front and the front-side of the back. Now how’s that for a sentence. 🙂

IMG_3941

Almost finished!! Next attach the  bottom. First baste together your layers. I just did purple, one layer of batting, and then gray. This is one seam I didn’t worry about finishing on the inside, it’s just too difficult to get to by hand, and really doesn’t matter. So right side of the costume to right side of the bottom piece, stitch.

IMG_3883

This can be a little difficult because you are sewing a circle to a rectangle, but take your time, it is possible. Remember that the Velcro edges will need to overlap as well. Trim edge, clip curves, and turn out.

Confession: I ended up sewing this piece and ripping it out four times. Yes, four. It seems like when I’m almost done with a project, I do something to make life more difficult. First time, the piece was a little too big. Second time, still too big. Third time, I sewed wrong side to right side. Fourth time – success! Seriously, it doesn’t matter the project, something always gets me. 🙂 My message to you, measure carefully!

Anyway, exciting, it’s really starting to look like a little Boo monster, almost done!!

Monster's Inc Boo Halloween Costume

Next, I attached the hood to the back of the costume. Sew right sides of the purple side only together, you want to leave the gray out so that you can hand finish that edge. Trim and press the seam. Wait to finish the interior.

IMG_4067

Now we need the finishing touches. Boo’s monster has googly eyes and mop like hair. Styrofoam balls, pipe stem cleaners, floral wire, and some cording accomplished that. The Styrofoam balls I picked were too big, like really too big, so I had to go back and buy smaller, lighter ones.

Finally, hand tack the hood lining along the center back seam and hand sew the seam between the of the hood and the gray back lining.

IMG_4093

Voila, we have a sweet little Boo! It’s far from perfect, but it was sewed with love (and actual blood and tears – see Part II).

Happy Halloween! In case you missed them, here are Part I and Part II.

–h

IMG_4123